Table Of Content

SkyCiv offers a Free Concrete Retaining Wall Calculator that will check overturning moment and perform a stability analysis on your retaining walls. The wall we built was a weekend-long project and an exhausting one at that. It took a day to rip out the old, collapsing retaining wall, to dig farther into the hill to provide room for the backfill gravel and to help unload materials. Staying updated with emerging techniques, materials, and technologies is crucial in the field of retaining wall design. The industry is constantly evolving, and new advancements can enhance the efficiency and longevity of retaining walls. Participating in industry conferences, seminars, and online forums facilitates knowledge exchange and keeps professionals abreast of the latest trends.
Segmental Retaining Wall Example By Hand Calculations
Photos: Painting a mural on drab Rt. 8 retaining wall in Cheshire - Berkshire Eagle
Photos: Painting a mural on drab Rt. 8 retaining wall in Cheshire.
Posted: Tue, 26 Oct 2021 07:00:00 GMT [source]
The free retaining wall calculator allows to check the wall stability for the specified load combination in three separate sub-tabs within the Graph tab. The Overturning tab shows the applied loads for the overturning analysis of the retaining wall. The Sliding tab shows the load diagrams and the resulting forces for the sliding analysis. The Bearing tab shows the applied loads to generate the bearing diagram under the wall footing.
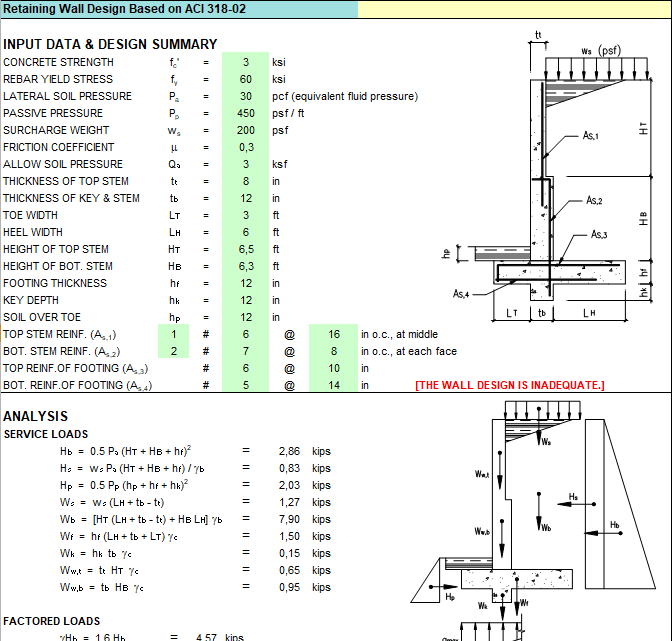
Retaining Wall Calculator
Mortared or concrete walls in heavy-frost areas require footings dug below the frost line. Nonmortared walls should be built on a gravel-filled trench dug below frost line. If you live where it doesn’t freeze and your soil drains well, you may be able to just scrape away topsoil to form a base for nonmortared walls. Weepholes actually penetrate the retaining wall and drain the area immediately behind the wall.
Step 3: Add Loading to Analyze
Loads can be categorized into dead loads, live loads, surcharges, and lateral earth pressure and these must always be considered in the design of a retaining wall. Although it's not common, wind loads might also play a role, for example, if there is a large exposed area on the top of the wall due to the installation of billboards. Thorough site analysis is crucial to understanding the soil properties, water tables, and slope stability.
Stem Shear and Moment Diagrams
Insert rebar in the footing when you pour it; this should be done every three blocks or at intervals specified by your local codes. As the last step, fill the cores around the rebar with mortar from the bottom to the top. A retaining wall must provide a way to release the water that builds up in the slope behind it. Without a pressure-relief system, the weight of the water in the soil would crack or even buckle the wall. Weep holes, lengths of ¾-inch pipe inserted along the top of the first course, escort some of the water out. The other part of the system is a plastic drainpipe covered with gravel.
Retaining wall design involves various factors and considerations that are specific to each project and site conditions. Construct the retaining wall using suitable materials and techniques, considering factors such as drainage, backfill compaction, and integration of the anchoring system. Determine the spacing and length of the soil nails based on the design requirements and soil conditions.
Hash Ridge Road: WVDOH to Install Piling Wall, Explains Design Process - WV Department of Transportation
Hash Ridge Road: WVDOH to Install Piling Wall, Explains Design Process.
Posted: Tue, 08 Mar 2022 08:00:00 GMT [source]
Regular inspections during construction are crucial to ensure that the retaining wall is built according to the design plans and specifications. Any deviations or potential issues should be addressed promptly to maintain structural integrity and compliance with American standards. The selection of appropriate reinforcements and anchoring systems depends on the specific project requirements, soil conditions, and the desired level of stability. Proper consideration of all these loads is essential to ensure that the retaining wall can safely resist the imposed forces and maintain stability over time.
Each type of retaining wall has its own advantages and disadvantages. Cantilever walls are very strong and can support a large amount of soil, but they require a lot of concrete and can be expensive to build. Gravity walls are cheaper to build than cantilever walls, but they are not as strong and can be susceptible to damage during earthquakes. Crib lock walls are very strong and can be built quickly, but they are not as aesthetically pleasing as the other types of retaining walls. Once you’ve finished designing the retaining wall it is time to update the soil material properties. You can adjust the color you would like for the soil, as well as update the friction angle, and unit weight.
Landscaping Walls for Your Yard
Due to the varying locations and geographical climates, the final drainage pipe sizing, depth, amount, and type will be done by your contractor. Xpress Engineering recommends hiring a local Civil Engineer who can determine water shed and/or ground water demands and size the drainage accordingly. Passive pressure is the “push back” of the soil in front of the wall. If a retaining wall does not have adequate friction to resist the forces pushing on the wall, passive soil is critical in the design. Passive soil is the undisturbed or newly compacted soil in front of the retaining wall shear key, footing, and on occasion, soil in front of the lower portion of the wall itself.
Preparing a troublesome site—one that includes clay soil or a natural spring, for example—can raise costs substantially. Add 10 percent or so if you hire a landscape architect or engineer. But shop around; some landscape firms do the design work for free if they do the installation.
The loading in this model is laid out as a uniform design load (you can multiply by your desired width to find the final loading condition). After you have finished adding your loads, you can move onto the final step. Cap blocks can be positioned with a slight overhang or back set, or set flush with the wall face. Provide a flat-as-a-pancake sand base for installing the first course of blocks. With the tops of the stakes as guides, use a long, straight screed board to level the sand.
The footing key is generally an extension of the stem and extends below the bottom of the base. All calculations come with a PDF detailed design report which lets engineers review the step by step calculations made. The SkyCiv documentation page features a lot of information on each of these zones. Feel free to read more about the various zones to better understand the analyses in our documentation website. By selecting each zone, you can update the soil type based on what we modified in the material section along with the soil type. Once you’ve defined the values for the different soil types, you can assign them to different layers of soil or in different locations of your model.


No comments:
Post a Comment